标注 Labeling
此处以最新的制作软件
vLabeler的Windows版本做示范。
This is an example of the Windows version of the latest production softwarevLabeler.您也可以使用您熟悉的传统标注软件,例如
setParam。
You can also use traditional labeling software that you are familiar with, such assetParam.
请注意,录音表模板的数值参考120BPM的
いつほし式8モーラガイドBGM设定。
Please note that the value of thetemplate refers to theいつほし式8モーラガイドBGMsetting of 120BPM.如果您采用其他的BGM,可以通过标注各模板内前1个音频(VC为前2个音频),并通过查找与替换来快速调整模板。
If you use other BGMs, you can mark the first audio in each template (the first two audio in VC) and quickly adjust the template by finding and replacing it.或者,您也可以采用生成器来生成模板,产生的模板会合并
CV和VC部分。
Alternatively, you can also use a generator to produce the template, and it will combineCVandVCparts.以Lite模板为例:
Take the Lite template as an example:#For CV _ba_pa_ma_fa_da_ta_na_la.wav=ba#,1450,150,-400,50,0 _ba_pa_ma_fa_da_ta_na_la.wav=pa#,1950,150,-400,50,0 _ba_pa_ma_fa_da_ta_na_la.wav=ma#,2450,150,-400,50,16 _ba_pa_ma_fa_da_ta_na_la.wav=fa#,2950,150,-400,50,16 _ba_pa_ma_fa_da_ta_na_la.wav=da#,3250,150,-400,50,0 _ba_pa_ma_fa_da_ta_na_la.wav=ta#,3750,150,-400,50,0 _ba_pa_ma_fa_da_ta_na_la.wav=na#,4250,150,-400,50,16 _ba_pa_ma_fa_da_ta_na_la.wav=la#,4750,150,-400,50,16 #For VC _si_qi_sheng_yi_chen_yi_ci_yi.wav=i0 q#,1700,300,-350,250,100 _si_qi_sheng_yi_chen_yi_ci_yi.wav=i sh#,2200,300,-350,250,100 _si_qi_sheng_yi_chen_yi_ci_yi.wav=eng y#,2700,300,-350,250,100 _si_qi_sheng_yi_chen_yi_ci_yi.wav=i ch#,3200,300,-350,250,100 _si_qi_sheng_yi_chen_yi_ci_yi.wav=en y#,3700,300,-350,250,100 _si_qi_sheng_yi_chen_yi_ci_yi.wav=i c#,4200,300,-350,250,100 _si_qi_sheng_yi_chen_yi_ci_yi.wav=i0 y#,4700,300,-350,250,100 #For VV _chi_en_e_eng_a_eng_e_ang.wav=ir ou#,1700,400,-600,300,100 _chi_en_e_eng_a_eng_e_ang.wav=en e#,2200,400,-600,300,100 _chi_en_e_eng_a_eng_e_ang.wav=e ou#,2700,400,-600,300,100 _chi_en_e_eng_a_eng_e_ang.wav=eng a#,3200,400,-600,300,100 _chi_en_e_eng_a_eng_e_ang.wav=a ou#,3700,400,-600,300,100 _chi_en_e_eng_a_eng_e_ang.wav=eng e#,4200,400,-600,300,100 _chi_en_e_eng_a_eng_e_ang.wav=e A0#,4700,400,-600,300,100不难注意到每个标注后边都有一个
#,这是方便后续替换音阶后缀的地方。
It’s not hard to notice that each annotation is followed by a#, which is where the pitch suffix can be replaced later.
当您完成一个音阶的标注后,可以将其作为下一个音阶标注的模板。
When you have finished labeling a pitch, you can use it as a template for labeling the next pitch.模板中CV/VC/Extra部分分开设定,设定完成后请合并回同一文件中。
CV/VC/Extra parts are seperated in OTO templates, merge them while OTO labeling are done.
建议您保留合并前的文件,以备后续可能的修改。
It is recommended that you keep the pre-merge files for possible future modifications.
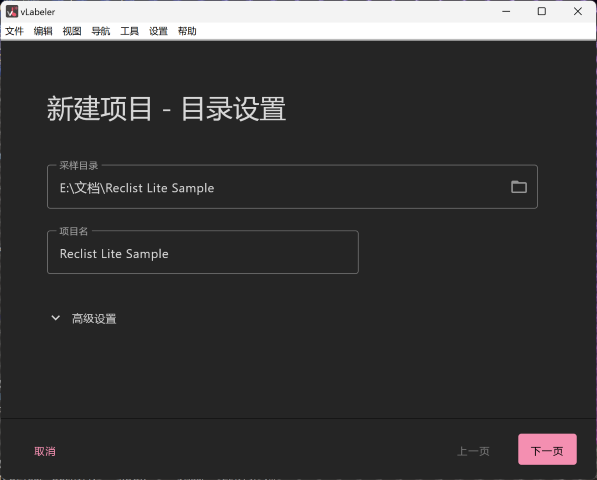
首先,新建项目,在目录设置中,选择在RecStar中录制完成的文件夹。
First, create a new project, and in the directory settings, select the folder where you want to record in RecStar.
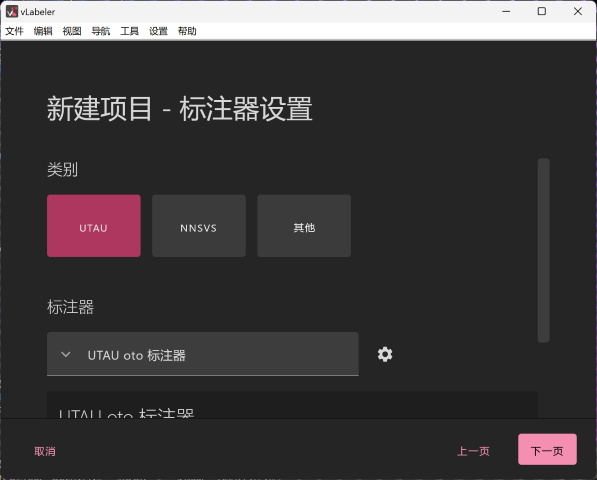
其次,在标注器设置中,选择UTAU oto 标注器。
Second, in the labeler settings, select UTAU oto labeler.
再次,在数据源设置中,选择文件,导入录音表所对应的oto模板。
Then, in the data source settings, select File and import the OTO template corresponding to the Reclist.
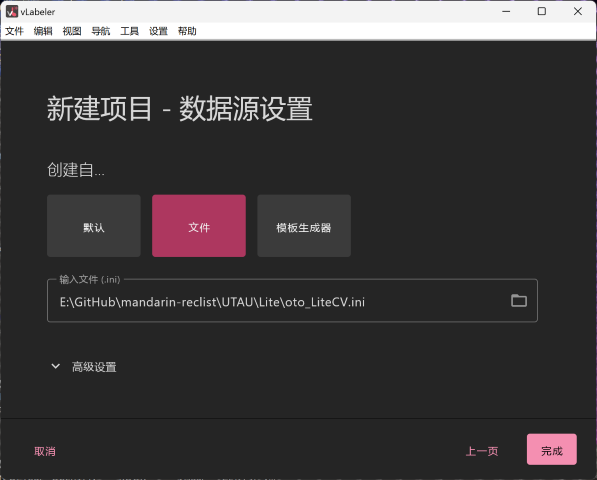
如果vLabeler提示您导入出错,尝试将oto模板移动到C盘并重新导入。
If vLabeler prompts you that there is an import error, try moving the oto template to C: and re-importing it.
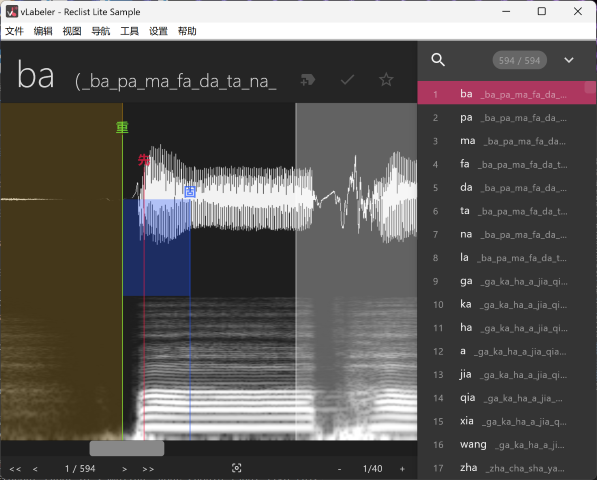
最后,您可以看到vLabeler的标注界面,开始进行标注。
Finally, you can see the labeling interface of vLabeler and start labeling.
标注规则 Labeling Rules
对于不同类型的采样,您的标注应如下:
For different types of sampling, your should label like this:
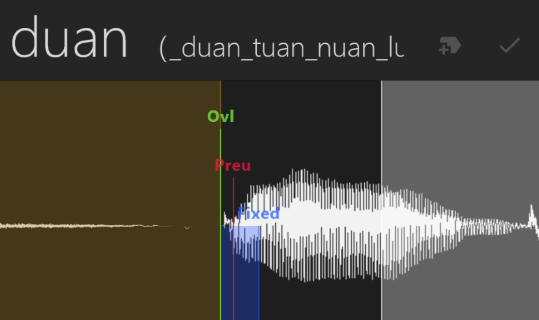
对于CV而言: For CV samples:
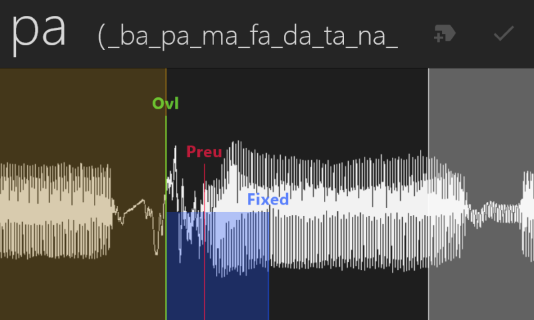
- 当其声母为爆破音时(b,p,d,t,g,k,j,q,zh,ch,z,c),黄线(左边界)与
重应该重合。
When the initials are plosives (b,p,d,t,g,k,j,q,zh,ch,z,c), the yellow line (left boundary) should coincide withOvl.
- 当其声母为其他辅音时(m,f,n,l,h,x,sh,r,s),
重应位于声母波形稳定处。
When the initials are other consonants (m,f,n,l,h,x,sh,r,s),Ovlshould be located at the stable initial waveform.
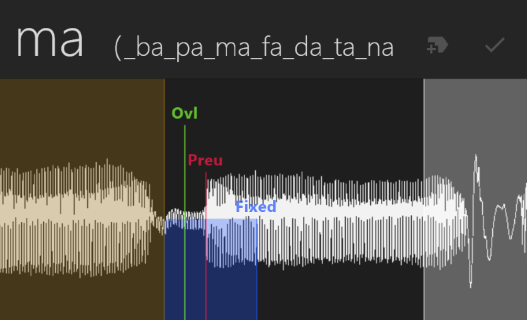
以上两种情况下,黄线(左边界)位于波形开始处,先位于辅音元音交界处。
In both cases, the yellow line (left boundary) is at the beginning of the waveform and the Preu is at the junction of the consonant vowels.
当其声母为半元音(y,w)或不含声母为纯元音时,黄线(左边界)、重、先应该重合。
When the initials are semi-vowels (y, w) or pure vowels without initials, the yellow line (left boundary), Ovl, and Preu should coincide.
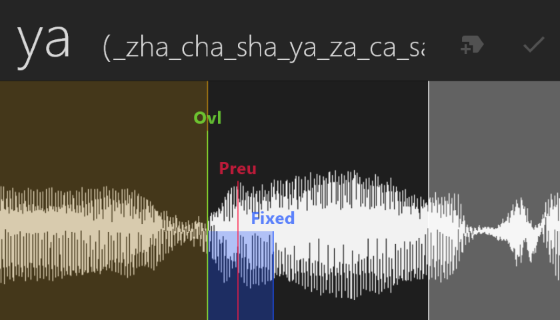
固和白线(右边界)分别位于韵腹(波形稳定处)的开头与结尾。
The fixed and white lines (right boundary) are located at the beginning and end of the Nucleus (where the waveform is stable).
- 当介音(i-,u-,ü-)存在时,它应该位于蓝色区域内。
When a Medial (i-, u-, ü-) is present, it should be within the blue area. - 当韵尾(-i,-u,-n,-ng)存在时,它应该位于白色区域内。
When the Ending (-i, -u, -n, -ng) are present, it should be within the white area.
对于VC而言: For VC samples:
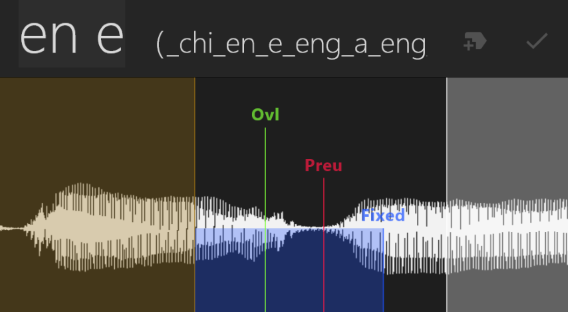
请将先放在元音与辅音的交界处。一般情况下,不用移动黄线(左边界)和重的位置。
Place Preu at the junction of vowels and consonants. In general, there is no need to move the yellow line (left boundary) and the Ovl position.
- 但当韵尾(-i,-u,-n,-ng)存在时,请确保
重位于韵尾开始处。
But when the Ending (-i, -u, -n, -ng) is present, make sure that theOvlis at the beginning of the rhyme. - 如果第二个音素是元音,或者您在制作VCV声库,请参照CV进行标注。
If the second phoneme is a vowel, or you’re making a VCV voicebank, please refer to the CV for labeling.
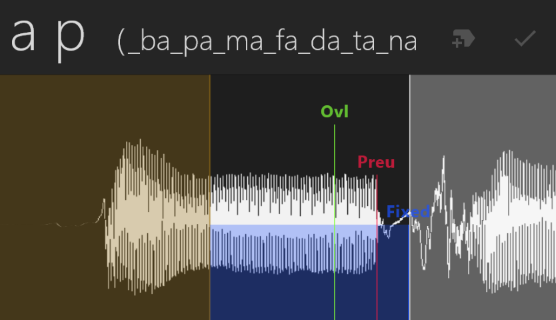
对于爆破音(b,p,d,t,g,k,j,q,zh,ch,z,c),请将固和白线(右边界)放在空白处。
For plosives (b,p,d,t,g,k,j,q,zh,ch,z,c), place the Ovl and the white line (right boundary) in the blank.
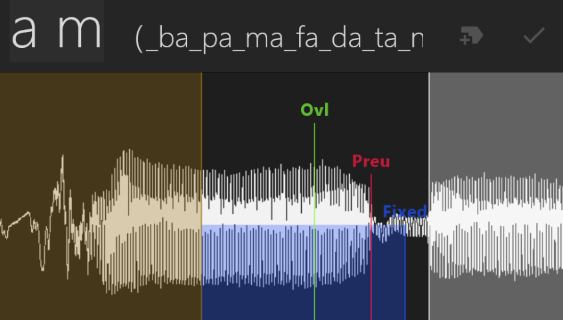
对于其他辅音(m,f,n,l,h,x,sh,r,s,y,w),请将固放在辅音波形稳定的地方,白线(右边界)放在辅音结束处。
For other consonants (m, f, n, l, h, x, sh, r, s, y, w), place Ovl where the consonant waveform is stable and the white line (right boundary) at the end of the consonant.
对于Extra而言: For Extra samples:
您可以按照自己的需求来设置开头音、长元音、结束吸气、结束吐气等采样。
You can set the Beginning, long vowel, ending breath-in, ending breath-out, and other samples according to your needs.
开头音可以看作没有元音的VC,而其他采样可以看作没有辅音的VC。
The Beginning can be seen as a VC without a vowel, while the other samples can be seen as a VC without a consonant.
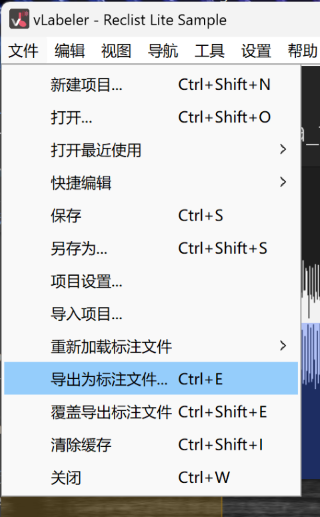
标注完成后,选择文件->导出标注文件以保存标注好的oto.ini。
After labeling completed, select File -> Export Label File to save the labeled oto.ini.
